最近看了《CSS揭秘》这本书,里面介绍了很多实用编码技巧,常常让人有茅塞顿开的感觉,这里将一些常用的技巧进行了总结和实践。
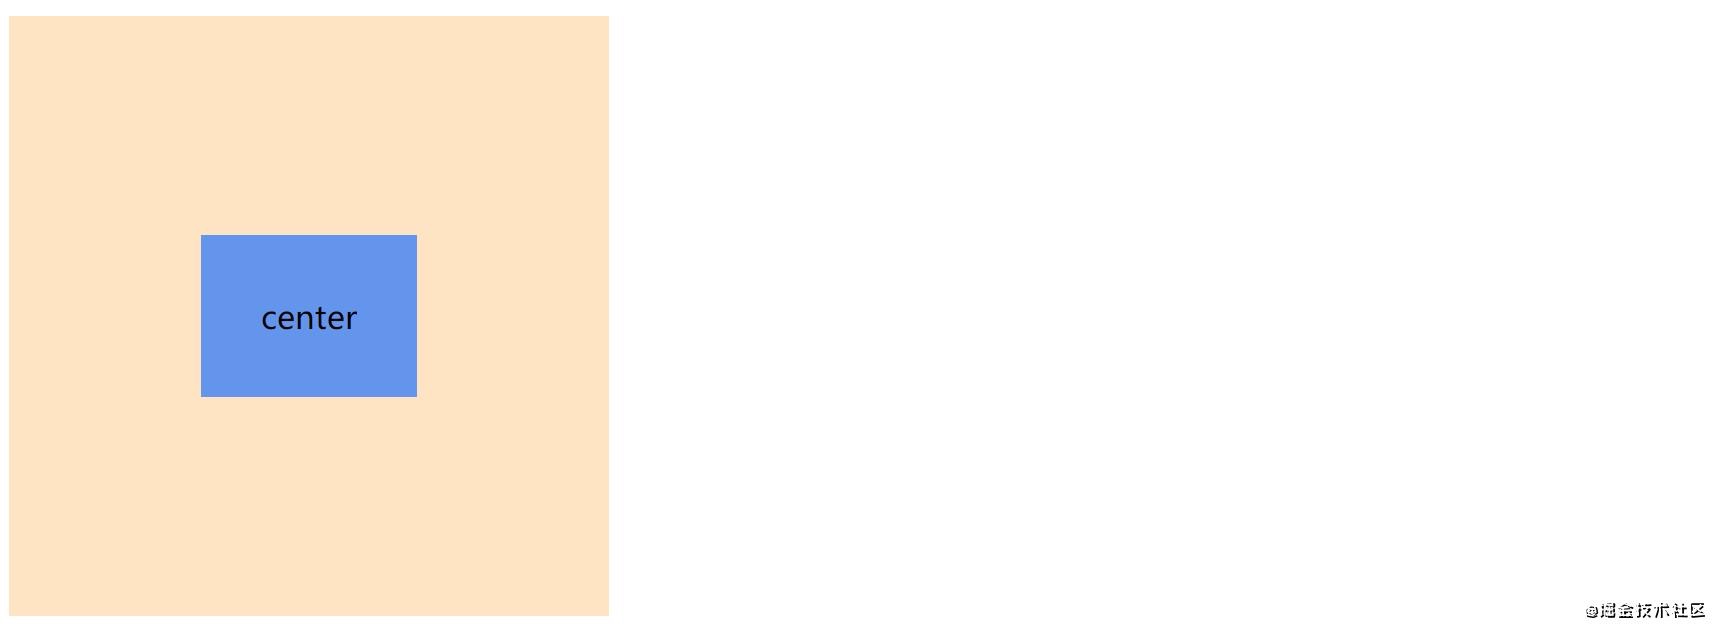
垂直居中
如何将一个未知高度的元素垂直居中,通常有两种常用的方法:
- 1、用绝对定位和translate
//html
<div class="parent">
   <div class="child">center</div>
</div>

//css
.parent{
   height: 300px;
   width: 300px;
   position: relative;
   background-color: bisque;
}
.child{
   position: absolute;
   top: 50%;
   left: 50%;
   transform: translate(-50%,-50%);
   padding: 30px;
   background-color: cornflowerblue;
}
- 2、基于 Flexbox 的解决方案
这是毋庸置疑的最佳解决方案,因为 Flexbox是专门针对这类需求所设计的,只是一些老的浏览器版本兼容性可能不是很好,具体可以查看caniuse,现代浏览器一般没问题。
.parent{
   height: 300px;
   width: 300px;
   background-color: bisque;
   display: flex;
   justify-content: center;
   align-items: center;
}
.child{
   padding: 30px;
   background-color: cornflowerblue;
}
紧贴底部的页脚
<body>
    <main>hello</main>
    <footer></footer>
</body>
在网站中,不管页面长度如何,我们都期望页脚应该紧贴底部。在页面够长时,显示没有问题,当页面较短时,页脚就会跑上去。
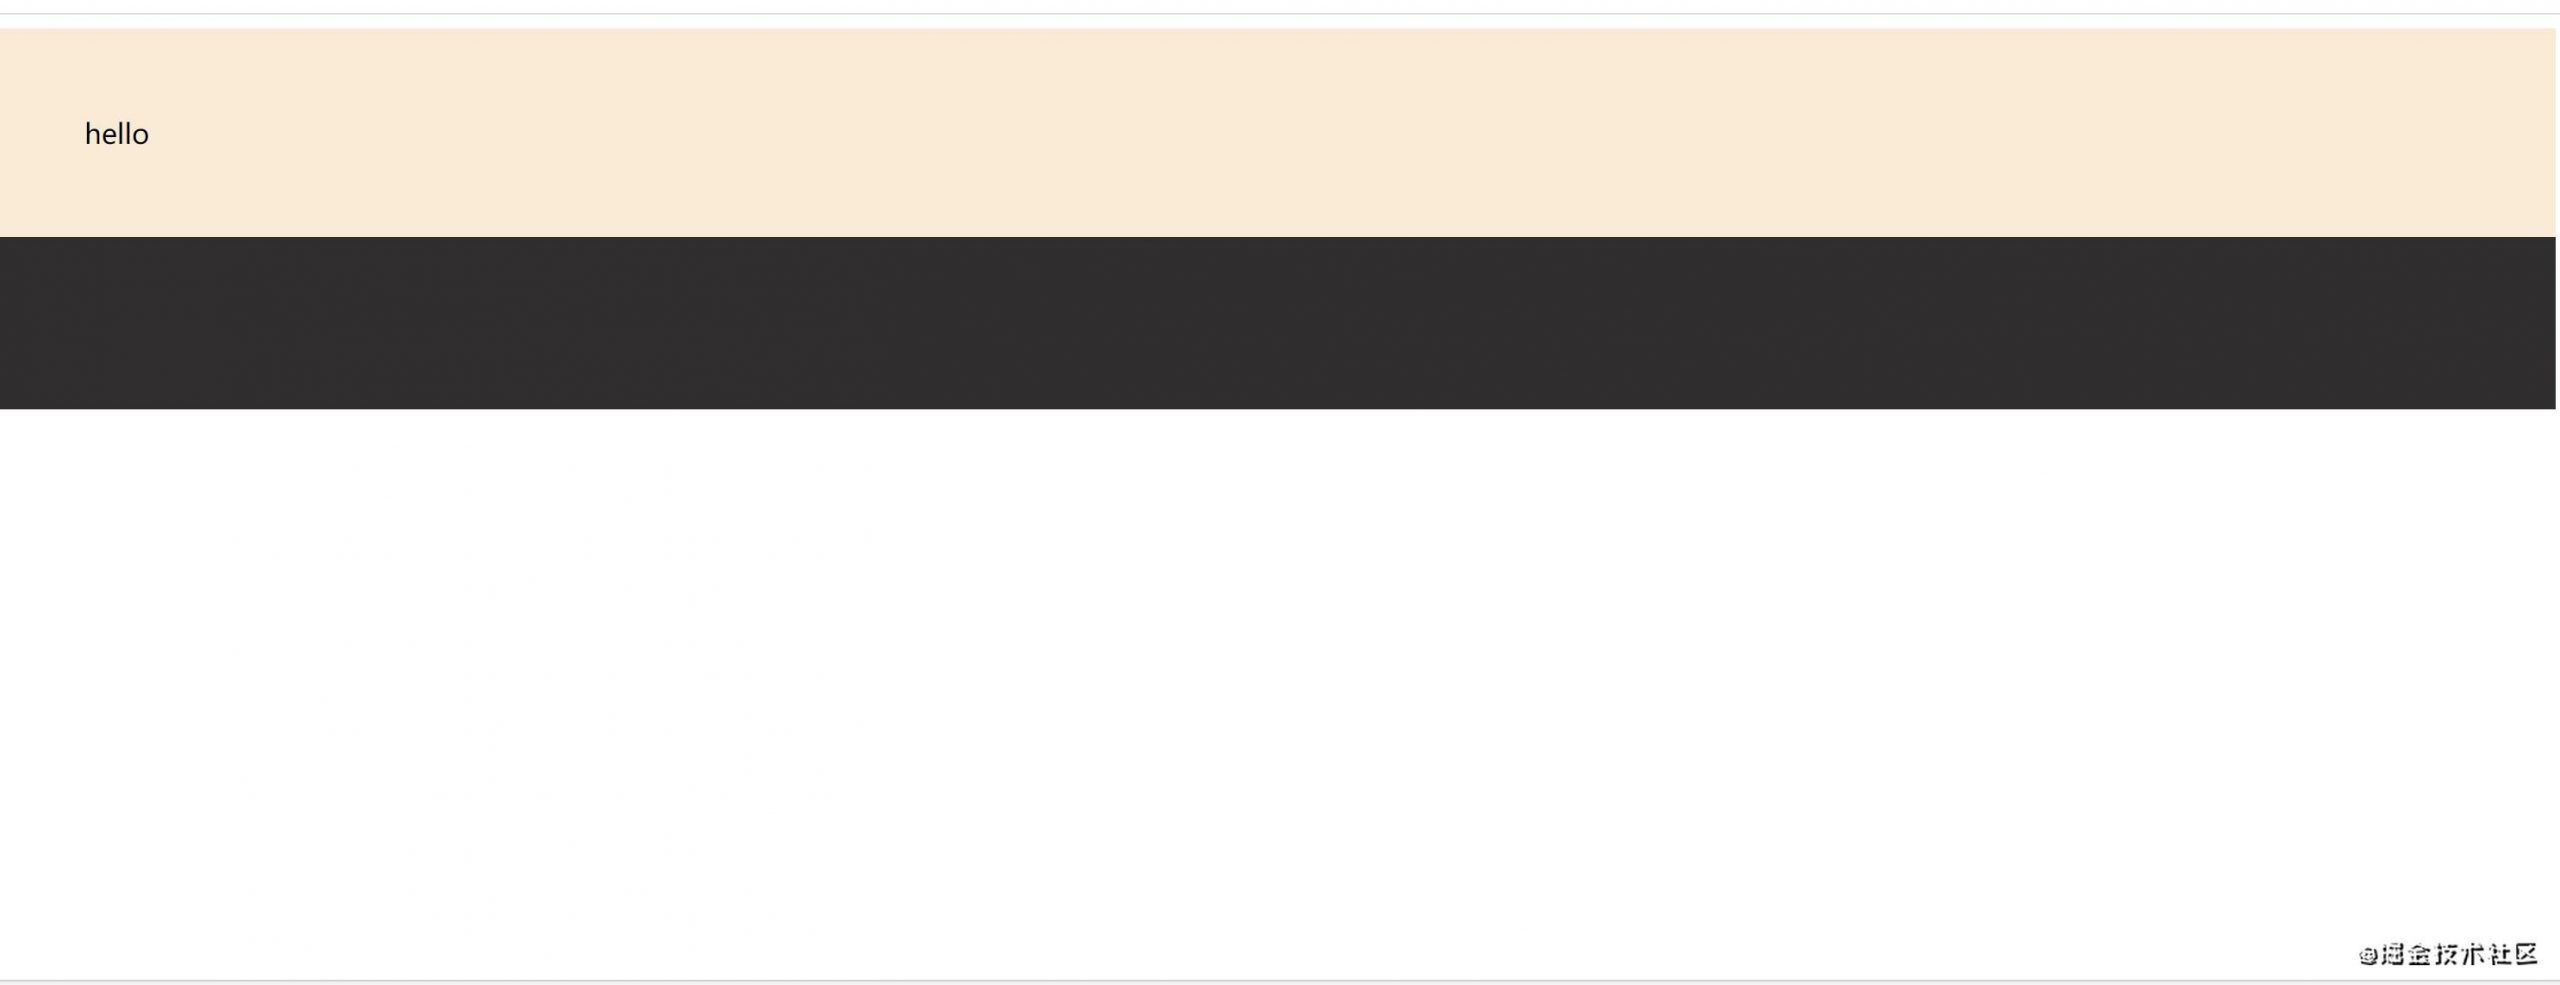
一个直观的方法,就是可以用calc计算出main的最小高度:min-height:calc(100vh - footer的高度);,这样做的前提就是已知footer的高度,如果footer的高度也是有它其中的内容决定,这样就行不通了。
解决这个问题依然可以用Flexbox。首先我们需要对body元素设置 display:flex,因为它是这两个主要区块的父元素,当父元素获得这个属性之后,就可以对其子元素触发“伸缩盒布局模型”。我们还需要设置flex-direction:column,把伸缩方向设为竖直方向。然后,给main的flex属性指定一个大于 0 的值(比如1)。
body{
  min-height: 100vh;
  display: flex;
  flex-direction: column;
}
main{
  flex: 1;
  background-color: antiquewhite;
  padding:30px;
}
footer{
  padding:50px;
  background-color: rgb(48, 46, 46);
}
这样,不管main和footer的内容多少,footer都会紧贴页面底部。

小提示:
- 这个 flex 属性实际上是 flex-grow、flex-shrink 和 flex-basis 的简写语法。
- 任何元素只要设置了一个大于 0 的 flex 值,就将获得可伸缩的特性;
- flex 的值负责控制多个可伸缩元素之间的尺寸分配比例。
- 举例来说,在我们眼前的这个例子中,如果
<main>是 flex:2 而<footer>是 flex:1,那么内容区块的高度将是页脚高度的两倍。 - 如果把它们的值从 2 和 1 改为 4 和 2,结果也是一样的,因为真正起作用的是它们的数值比例。
九宫格图片展示
朋友圈、微博的图片展示会根据数量不同而样式不同,这也可以用纯css实现。在《css揭秘》中,根据兄弟元素的数量来设置样式讲到的技巧就可以解决这个问题。
我们知道css中有一些跟子元素排序相关的伪类选择器,例如,
- :nth-child(n) — 匹配属于其父元素的第n个子元素
- :nth-last-child(n) — 匹配属于其父元素的倒数第n个子元素
- :only-child — 匹配属于其父元素的唯一一个子元素,等价于:nth-child(1):nth-last-child(1)
这些选择器单用很容易理解,其实,可以把它们联合起来,用以更精确定位元素。
在下面这个例子中,img:nth-child(2):nth-last-child(3)表示定位正向数排第二、倒向数排第三的img元素,也就是,只有总数为4,且正向排第二的元素满足条件。将这个元素的margin-right调大,就能将4张图情况下第三张图 “挤” 到下一排,实现四张图的四方格排列。img:only-child表示只有一张图的情况,这个时候要按照图片的横竖比例显示,因此图片不能设置height和width,而是用max-height max-width限制图片的高/宽最大值。
<p>天气真好!</p>
<div class="album">
    <img src="./images/bg.jpg" />
    <img src="./images/cat2.jpg" />
    <img src="./images/pic1.jpg" />
    <img src="./images/pic2.jpg" />
    <img src="./images/pic3.jpg" />
    <img src="./images/pic4.jpg" />
    <img src="./images/pic5.jpg" />
    <img src="./images/pic6.jpg" />
    <img src="./images/pic9.jpg" />
</div>
.album{
    margin-left: 50px;
    width: 342px;
}
img{
    height: 110px;
    width: 110px;
}
img:only-child{
    height: initial;  /*相当于删除已设置的某一属性*/
    width: initial;
    max-width: 230px;
    max-height: 230px;
}
img:nth-child(2):nth-last-child(3){
    margin-right: 110px;
}

灵活的背景定位
假如写了一封信,要在结尾处盖一个标记。我们可以将这个标记作为背景图定位到右下角。 background-position属性用于设置背景图像在元素中的位置。我们设置background-position: right bottom,标记会紧贴右下角。

要使标记与边框有一定距离,可以设置background-position: right 20px bottom 20px。

如果想要使背景距离边框的距离刚好和padding相同(即使修改padding的值也如此),也可以修改background-origin。每个元素对应三个矩形框:border box(边框的外沿框)、padding box(内边距的外沿框)和 content box(内容区的外沿框),当我们写background-position: right bottom时,默认的是padding box的右下角。如果要对齐content box的右下角,就可以修改background-origin:content-box;
background-position的另一个常见应用就是雪碧图。当一个网页中用到很多小图标,我们可以将这些小图标合成一张图,以减少网络请求。使用的时候就通过background-position定位不同的图标。
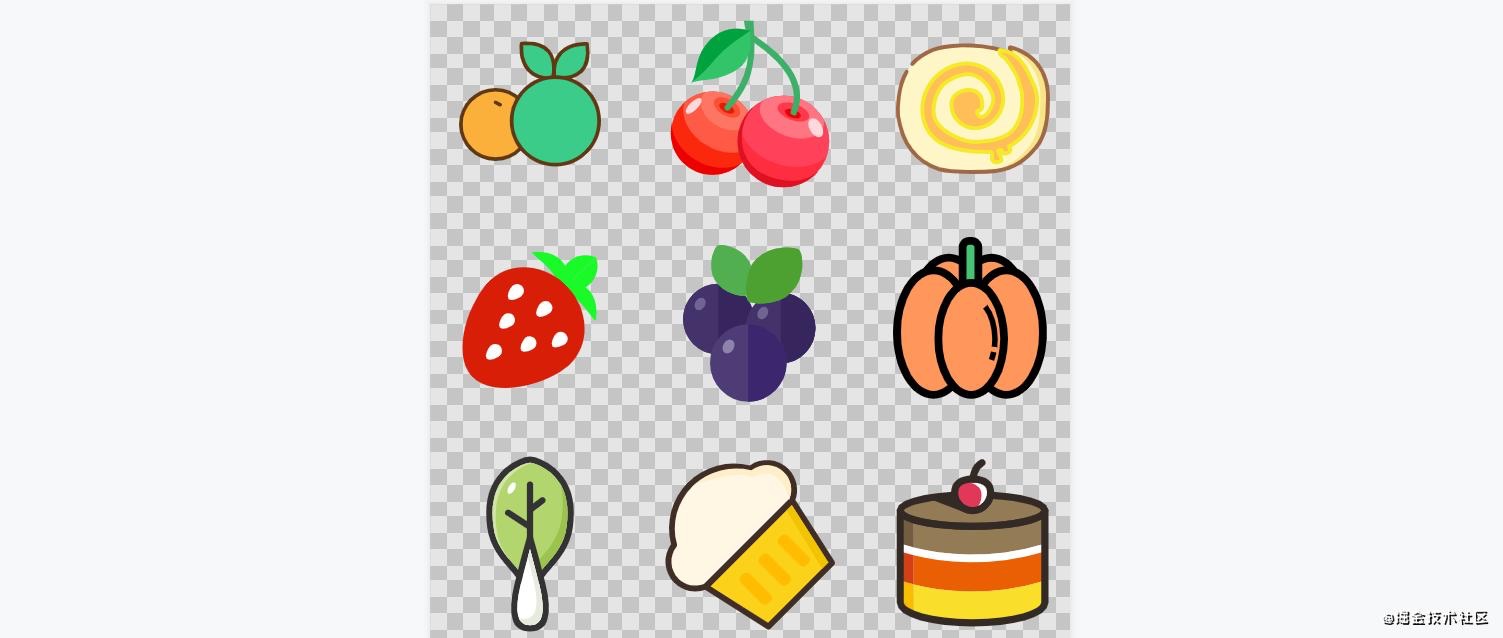
比如这样一张雪碧图,已知每个图标的尺寸是200px,图标与图标的间隔是20px。

雪碧图的background-position是负数,相当于把背景图片相对于元素左上角往上挪或往左挪一定距离,比如把背景图往左挪220px,此时元素左上角就对着樱桃的左上角,显示的背景图就是樱桃。
条纹背景
条纹背景是基于渐变背景。
<div class="bg"></div>
.bg{
  height: 100px;
  width: 200px;
  background: linear-gradient(#fb3,#58a);
}

将这两个色标拉近:
background: linear-gradient(#fb3 20%,#58a 80%);

div顶部的 20% 区域被填充为 #fb3 实色,而底部 20% 区域被填充为 #58a 实色。真正的渐变只出现在容器 60% 的高度区域。
如果两个颜色都设为50%,就得到了两块均分div背景地实色。

因为渐变是一种由代码生成的图像,我们能像对待其他任何背景图像那样对待它,而且还可以通过 background-size 来调整其尺寸。
background: linear-gradient(#fb3 50%,#58a 50%);
background-size: 100% 20px;
由于背景在默认情况下是重复平铺的,整个容器其实已经被填满了水平条纹。

也可以创建不等宽条纹:
background: linear-gradient(#fb3 30%,#58a 30%);

如果某个色标的位置值比整个列表中在它之前的色标的位置值都要小,
则该色标的位置值会被设置为它前面所有色标位置值的最大值。
这意味着,如果我们把第二个色标的位置值设置为 0,那它的位置就总是会被浏览器调整为前一个色标的位置值
我们可以将上面地代码改成:
background: linear-gradient(#fb3 30%,#58a 0);
如果要创建多色条纹:
background:linear-gradient(#fb3 33.3%, #58a 0, #58a 66.6%, yellowgreen 0);

蚂蚁行军边框

<div class="ants-border">
   Lorem ipsum, dolor sit amet consectetur adipisicing elit. Laudantium, debitis vel quam tempora ut nisi voluptatibus rem ab. Quas, cum. Itaque, dignissimos! Quos, eos placeat eveniet quasi amet eius officiis!
</div>
.ants-border{
   width: 500px;
   padding: 1em;
   border: 1px solid transparent;
   background-image: linear-gradient(white, white),
                     repeating-linear-gradient(
                        -45deg,
                        #000 0%, #000 25%,
                        #fff 0%, #fff 50%
                     );
  background-size: 10px 10px;
  background-clip: padding-box, border-box;
  animation: ants 10s linear infinite;
}
@keyframes ants {
  to {
     background-position: 100%;
  }
}
绘制步骤:
1、给div加一层黑白色条纹背景。
.ants-border{
   width: 500px;
   background-image: repeating-linear-gradient(-45deg, #000 0%, #000 25%, #fff 0%, #fff 50%);
   background-size: 10px 10px;  /*控制条纹的宽度*/
   /*默认背景图像会repeat铺满全屏*/
}

2、再加一层白色背景。当一个元素设置多个background-image时,如果位置重叠,则写在前面的背景会覆盖写在后面的背景。此时背景为白色。
.ants-border{
   ...
   background-image: linear-gradient(white, white),repeating-linear-gradient(-45deg, #000 0%, #000 25%, #fff 0%, #fff 50%);
   background-size: 10px 10px;
}
3、背景有一个属性background-clip,初始值是border-box,意味着背景会铺满border-box。

为了让条纹背景露出来形成蚂蚁边框,我们将两层背景的background-clip分别设为padding-box和border-box。
.ants-border{
   ...
   background-image: linear-gradient(white, white),repeating-linear-gradient(-45deg, #000 0%, #000 25%, #fff 0%, #fff 50%);
   background-size: 10px 10px;
   background-clip: padding-box, border-box;
}
此时白色背景铺满padding-box,条纹背景铺满border-box,此时依然时白色背景,因为没有设置border时,这两个box的范围是重叠的。所以设置一个1px的border,颜色为透明色。
.ants-border{
   ...
   border: 1px solid transparent;
}

4、通过动画不断改变背景的位置,形成移动的“蚂蚁”
@keyframes ants {
   to {
       background-position: 100%;
   }
}
裁切路径(clip-path)
clip-path允许我们把元素裁剪为我们想要的任何形状。
<img class="pic" src="images/pic7.jpg">
菱形:

.pic{
   clip-path: polygon(50% 0,100% 50%,50% 100%,0 50%);
}
圆形:

.pic{
   clip-path: circle(50%);
}
也可以指定svg作为剪切路径:
<img class="pic" src="images/pic7.jpg">
<svg>
    <clipPath id="myPath" clipPathUnits="objectBoundingBox">
      <path d="M0.5,1
        C 0.5,1,0,0.7,0,0.3
        A 0.25,0.25,1,1,1,0.5,0.3
        A 0.25,0.25,1,1,1,1,0.3
        C 1,0.7,0.5,1,0.5,1 Z" />
    </clipPath>
</svg>
.pic{
   clip-path: url(#myPath)
}

CSS 裁切路径可以同时使用百分比数值(它会以元素自身的宽高作为基数度进行换算)和绝对长度值。
伪类
《css揭秘》中,讲了不少伪类的编码技巧。借助伪类,可以用清晰的html结构巧妙地实现很多效果。
平行四边形背景

将长方形变成平行四边形,可以用transform: skewX(degree),直接用于元素上的话,文字也会变形。对此,可以把所有样式应用到伪元素上,然后再对伪元素进行变形。因为我们的内容并不是包含在伪元素里的,所以内容并不会受到变形的影响。这适用于其他任何变形样式,当我们想变形一个元素而不想变形它的内容时就可以用到它。
<span class="btn">click me</span>
.btn{
   margin: 50px;
   position: relative;
   padding: 10px 20px;
}
.btn:before{
   content: '';
   position: absolute;
   top: 0;
   bottom: 0;
   left: 0;
   right: 0;
   background-color: aqua;
   z-index: -1;
   transform: skewX(-20deg);
}
对话气泡

<div class="dialogue">你说了啥?</div>
.dialogue{
   margin-top: 50px;
   padding: 10px;
   border-radius: 2px;;
   display: inline-block;
   position: relative;
   border: 1px solid #ccc;
   max-width: 300px;
   background-color: #fff;
}
.dialogue:before{
   content: '';
   height: 8px;
   width: 8px;
   border: 1px solid;
   border-color: #ccc transparent transparent #ccc;
   background-color: #fff;
   position: absolute;
   top: 15px;
   right: -6px;
   transform: rotate(135deg);
}
扩大可点击区域
对于那些较小的、难以瞄准的控件来说,如果不能把它的视觉尺寸直接放大,将其可点击区域向外扩张往往也可以提升用户体验。
伪元素可以代表其宿主元素来响应鼠标交互,所以我们可以在按钮的上层覆盖一层透明的伪元素,并让伪元素在四个方向上都比宿主元素大出10px。
button {
  position:relative;
  /* [其余样式] */
}
button:before {
   content:'';
   position:absolute;
  top:-10px;
   right:-10px;
  bottom:-10px;
   left:-10px;
}
基于伪元素,我们基本上可以把可点击区域设置为任何想要的尺寸、位置或形状,甚至可以脱离元素原有的位置。
自定义的复选框

在表单元素中,为了扩大checkbox的点击范围,我们经常用label和checkbox对应,这里可以把样式加在label上,隐藏checkbox。
<input class="switch" type="checkbox" id="connect" />
<label for="connect"></label>
.switch{   /*隐藏复选框,通过label来响应点击*/
   position: absolute; /*不能使用 display:none,那样会把它从键盘tab键切换焦点的队列中删除*/
   clip: rect(0,0,0,0)
}
.switch + label {   /*设置未选中状态的label样式*/
   display: inline-block;
   height: 15px;
   width: 30px;
   border-radius: 10px;
   background-color: #eee;
   position: relative;
}
.switch + label:before {  /*可滑动的小按钮为label:before伪类*/
   content: '';
   display: inline-block;
   position: absolute;
   height: 15px;
   width: 15px;
   border-radius: 50%;
   background-color: #fff;
   right: 0;
   top: 0;
   box-shadow: 0 0 2px #666;
}
.switch:checked + label {  /*设置选中状态的label样式*/
   background-color: yellowgreen;
}
.switch:checked + label:before {
   left: 0;
}
和:checked类似,还可以利用伪类选择器:hover,:focus,:disabled设置复选框不同状态的样式。
毛玻璃效果

毛玻璃效果就是模糊效果,关键是让谁模糊?对元素运用filter: blur(30px)会让它的子元素也变模糊,所以不能让class="content"元素模糊;这里文本所在的区域宽高是不定的,所以没办法用一个空div做模糊效果,然后“垫”在class="content"元素下面。于是,我们想到了伪类。
<div class="poem">
   <div class="content">
       <p>
            明月别枝惊鹊,<br>
            清风半夜鸣蝉。<br>
            稻花香里说丰年,<br>
            听取蛙声一片。<br>
            七八个星天外,<br>
            两三点雨山前。<br>
            旧时茅店社林边,<br>
            路转溪桥忽见。<br>
       </p>
   </div>
</div>
将伪类的位置设置成和内容元素一样,使用负的 z-index 来把一个伪类移动到class="content"元素下层。在使用负的 z-index 来把一个子元素移动到它的父元素下层时,请务必小心:如果父元素的上级元素有背景,则该子元素将出现在它们之后。 所以为class="content"元素设置z-index: 1;使伪元素出现在父父元素(class="poem"元素)之上。
为伪元素设置和class="poem"元素一样的背景,为了让伪元素和class="poem"元素的背景重叠,用background-attachment: fixed 。此时对伪元素使用filter: blur(30px);就形成了毛玻璃效果。
.poem{
   width: 100vw;
   height: 100vh;
   display: flex;
   justify-content: center;
   align-items: center;
}
.poem,.content::before{
   background: url('./images/pic9.jpg');
   background-size: cover;
   background-attachment: fixed;
}
.poem .content{
   box-sizing: border-box;
   color:#f9f9f9;
   font-size: 20px;
   line-height: 2.2em;
   letter-spacing: 3px;
   text-align: center;
   padding: 40px 30px 35px 40px;
   background: hsla(0, 0%, 100%, 0.3);
   position: relative;
   overflow: hidden;
   z-index: 1;
}
.poem .content::before{
   content: '';
   position: absolute;
   top: 0;
   left: 0;
   right: 0;
   bottom: 0;
   filter: blur(30px);
   margin: -30px;
   z-index: -1;
}
css滤镜(filter)
hsl
学习css滤镜还是要先学习一下hsl色彩模型,可以看这位小姐姐的视频,色彩系列课程 讲得很清楚。
- 色相(HUE): 色彩的一种属性,光学透色以波长来划分。色相是不含黑白灰的纯色,下面是一个纯色的基础色轮。

- 饱和度(SATURATION):又称纯度,所显示色彩的鲜艳深浅。
- 明度(LIGHTNESS):色彩的亮度,高低决定明暗。
在色相的基础上,调整饱和度和明暗度可以得到不同的色彩效果。
不规则形状投影
box-shadow没有办法给不规则形状加阴影。比如气泡对话框。

使用filter:drop-shadow可以解决这个问题。

虽然都是处理阴影,box-shadow 是给整个元素box加阴影,而 drop-shadow 只给不透明的部分加阴影。以图片为例,下图除了水果部分,周围都是透明的。


染色效果

img{
   height: 100px;
   width: 100px;
   border-radius: 50%;
   filter: sepia() hue-rotate(70deg);
   transition: .5s filter;
}
img:hover{
  filter: none;
}
通过模糊来弱化背景
模糊背景的应用场景还挺多的,比如手机解锁、网站登录、qq音乐播放页面模糊专辑图片来当背景。
简易音乐播放面板
<div class="main">
   <img src="./images/reading.webp" />
   <div>
       东区的咖啡座<br>
       时间的杯子<br>
       满满的心事<br>
       blablabla~~~~<br>
   </div>
</div>
.main{
     position: relative;
     display: flex;
     flex-direction: column;
     align-items: center;
     color: #fff;
     text-align: center;
     font-size: 20px;
     line-height: 2em;
     background: rgba(0, 0, 0, 0.1);
}
.main:before{
     z-index: -1;
     content: '';
     position: absolute;
     top: 0;
     left: 0;
     bottom: 0;
     right: 0;
     background: url("./images/reading.webp");
     background-size: 100% 100%;
     filter: blur(30px) opacity(0.6);
     /*
     这里不能将滤镜直接加在.main元素,而是将背景和滤镜都加在伪类上。
     因为,父元素加了滤镜,它的子元素都会一起由该滤镜改变。
     */
}
.main img{
     height: 160px;
     width: 160px;
     border-radius: 50%;
     margin: 100px 0 50px;
     animation:rotate 5s linear infinite;
}

@keyframes rotate {
     to{
         transform: rotate(1turn);
     }
}

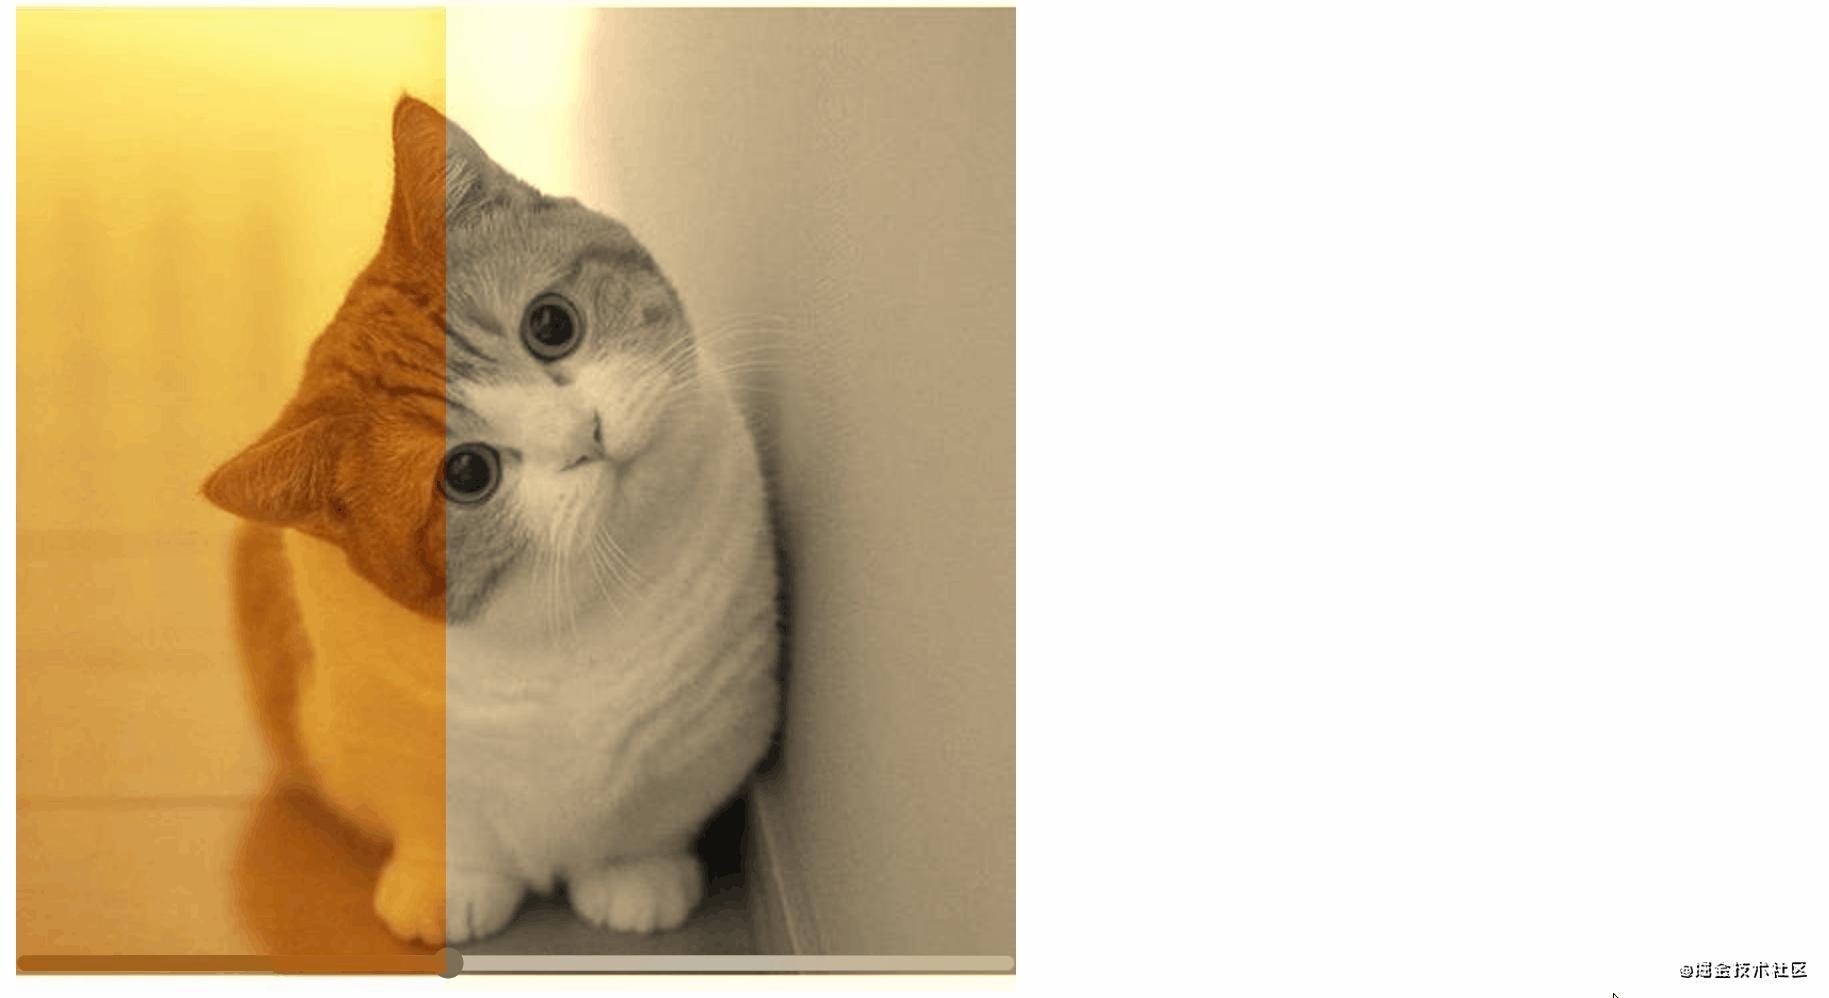
交互式的图片对比控件
<div class="image-slider">
   <img class="gray" src="./images/cat1.jpg"/>
   <div class="upper-img">
       <img src="./images/cat1.jpg"/>  <!--比对的两张图可以是任意两张图,只是这里是滤镜对比-->
   </div>
   <input type="range" />
</div>
.image-slider {
   position: relative;
   display: inline-block;
}
.image-slider > div {
   position:absolute;
   top: 0;
   left: 0;
   right: 0;
   bottom: 0;
   width: 50%;
   overflow: hidden;
}
.image-slider img {
   display: inline-block;
   user-select: none;
}
.image-slider .gray {
   filter: sepia();
}
.image-slider input[type="range"]{
   position: absolute;
   left: 0;
   bottom: 10px;
   width: 100%;
   margin: 0;
   filter: contrast(0.5);
   mix-blend-mode: luminosity;
}
<script>
   let range = document.querySelector('input[type="range"]'),
       upperImg = document.querySelector('.upper-img')
   range.addEventListener('input', function(ev){
      upperImg.style.width = ev.target.value + '%'
   })
</script>
文字描边和文字发光
text-shadow 属性向文本添加一个或多个阴影。

<div class="hollow">css</div>
<div class="glow">glow</div>
div{
    height: 200px;
    width: 300px;
    font-size: 100px;
    text-align: center;
}
.hollow{
    background-color: deeppink;
    color: #fff;
    text-shadow: 1px 1px black, 1px -1px black, -1px 1px black, -1px -1px black;
    /*没有模糊距离值,相当于镶边效果*/
}
.glow{
    background-color: #203;
    color: #ffc;
    text-shadow: 0 0 .1em, 0 0 .3em;  /*没指定颜色,阴影就和文字一个颜色*/
}
动画
缓动、逐帧 — animation-timing-function
我们经常会用到动画animation, 比如animation:rotate 5s linear infinite, 这里第三个参数linear是动画时间函数animation-timing-function, 它定义CSS动画在每一动画周期中执行的节奏,通俗一点,就是动画速度,比如常见的,匀速(linear)、先快后慢(ease-out)、先慢后快(ease-in)、中间快两头慢(ease-in-out),这些都是方便的写法,但是不够定制,比如,我们想要一个动画,前面特别快,10%的时间完成90%的动画,仅用这些关键词就做不到。
为了让动画速度更加DIY,可以用cubic-bezier, 它也是animation-timing-function的一种,animation: rotate 1.5s cubic-bezier(.27,1.07,.75,.96) infinite;。 cubic-bezier称为三次贝塞尔曲线,主要是生成速度曲线的函数。 它的推导和计算后面会单独一篇讲,我们这里主要看它的使用。cubic-bezier(.27,1.07,.75,.96)参数接受四个值,这四个值其实是两个控制点(下图中,红色和绿色的手柄)的坐标。

通过调整这两个控制点,可以调整黑色贝塞尔曲线的斜率,这个斜率就代表了速度,上图的贝塞尔曲线的斜率先大后小,再变大,对应的动画速度也是先快后慢再快。
调整贝塞尔曲线的网站, cubic-bezier.com/#.17,.67,.8…

这个贝塞尔时间函数对应的动画速度就是先快后慢,我们用它来写一个转圈的加载动画。

第一个是cubic-bezier(.23,1.21,.81,.94); 第二个是linear; 第三个是steps(n)。
<span></span>
<span></span>
<span></span>
span{
   display: inline-block;
   height: 30px;
   width: 30px;
   border: 2px solid;
   border-color: transparent lightcoral lightcoral lightcoral;
   border-radius: 50%;
   animation: rotate 1.5s cubic-bezier(.23,1.21,.81,.94) infinite;
}
span:nth-child(2){
   animation-timing-function: linear;
}
span:nth-child(3){
   animation-timing-function: steps(2);
}
@keyframes rotate {
   to{
       transform: rotate(360deg)
   }
}
动画除了上面讨论的平滑过渡,还有就是逐帧过渡steps(n)。与平滑过渡迥然不同的是,steps(n)会根据你指定的步进数量(n),把整个动画切分为n帧,而且整个动画会在帧与帧之间硬切,不会做任何插值处理。
逐帧动画结合雪碧图是实现图片素材动画的基础。比如我们可以用三张图代表小鸟飞翔时翅膀的三种状态,再通过逐帧动画不断切换这三张图,就可以实现小鸟的飞。

<span class="bird"></span>
.bird{
    display: inline-block;
    height: 45px;
    width: 52px;
    background: url('./images/birds.png') no-repeat;
    background-position: -1px;
    animation: fly .5s steps(3) infinite;
}
@keyframes fly {
   100%{
       background-position: -156px;
   }
}

可暂停的动画 — animation-play-state
假如要实现这样一个效果:展示一幅很长的图,当鼠标停在图上,图开始移动,鼠标移开,图停止移动,鼠标再移上去,图从上次停的地方又开始移动。

<div class="window"></div>
.window{
    height: 150px;
    width: 150px;
    background: url(./images/bg.jpg) no-repeat;
    background-size: auto 100%;
    animation: move-pic 10s linear infinite alternate;
    animation-play-state: paused;  /*非hover状态,动画暂停*/
}
.window:hover{
    animation-play-state: running;  /*hover状态,动画继续*/
}
@keyframes move-pic {
   to {
       background-position: 100% 0;
   }
}
动画延迟 — animation-delay
animation-delay规定在动画开始之前的延迟。

有些时候可以用这种 头像+水波纹 的效果提示新消息,这可以用animation-delay实现:
<div class="wave">
  <img src="./images/cat1.jpg" />
  <span></span>
  <span></span>
</div>
.wave{
   position: relative;
}
.wave img{
   height: 50px;
   width: 50px;
   border-radius: 50%;
}
.wave span{
   position: absolute;
   z-index: -1;
   top: -1px;
   left: -1px;
   height: 50px;
   width: 50px;
   border-radius: 50%;
   border: 1px solid orange;
   animation: 2s wave linear 4;
   opacity: 0;
}
.wave span:nth-of-type(2){
   animation-delay: 1s;
    /*用animation-delay将两个span的动画错开,形成水波纹*/
}
@keyframes wave {
   50%{
       transform: scale(1.2);
       opacity: 1;
   }
   100%{
       transform: scale(1.4);
       opacity: 0;
   }
}
参考
- 本文转载于掘金 CSS的N个编码技巧

